2024

DIY Electronics: Building Your Own Hardware from Scratch


Demystifying the Arduino Uno: A Comprehensive Guide to its PCB, Components, and Breadboarding Essentials

This tutorial aims to provide a thorough understanding of the inner workings of the Arduino Uno, breaking down its printed circuit board (PCB) and components, and explaining how to replicate its functionality using just a few essential parts. By the end, you’ll have a clear grasp of each component’s role and which ones are crucial to the board’s operation.

The Microcontroller

When making projects with an Arduino, we tend to think of them like the image below. We have a sensor connected, and maybe an LED, and we connect those components to the Arduino’s pins. Then, our code can be uploaded to use those components as inputs and outputs.
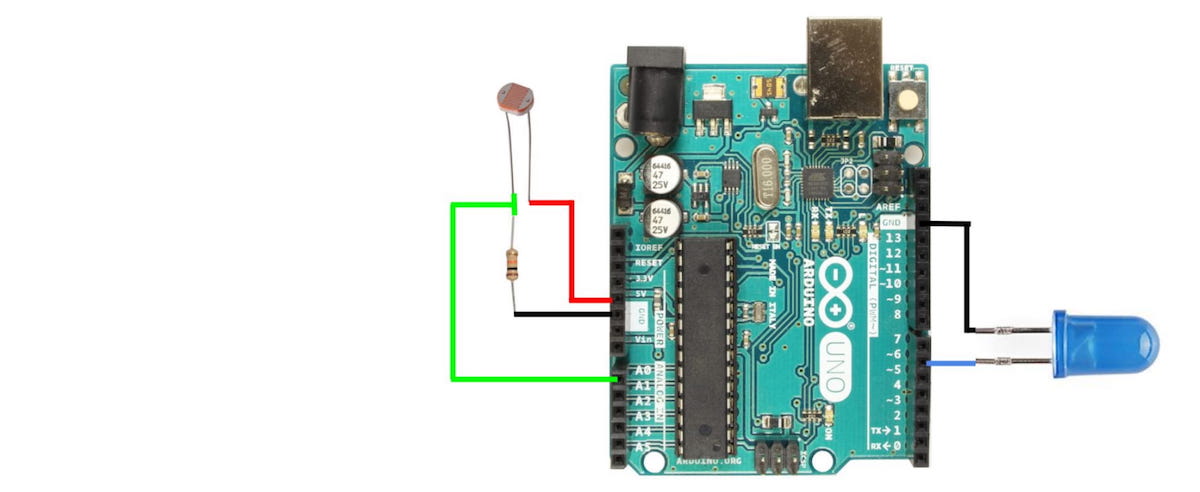
In Homemade Hardware, we make our own circuit boards, so it would be helpful to go through the Arduino Uno to understand all its inner workings and design decisions.

The Arduino Uno is probably the most popular microcontroller among makers and students, since its release in 2010. This is still the case today, because of it’s giant body of open source software, and ease of use.

This popularity is centralized around…

Smart AC Power Control: A Programmable Interface for Customized Automation


Based on the working principle of thyristor firing angle control, AC power can be controlled. The system uses a display unit to show the full power, and then the user can input the desired percentage to reduce the power to the load. To maintain the load power, the firing angle will be automatically adjusted. The project uses a lamp to make the input power equal to the required power. This process is achieved by connecting a TRIAC in series with the AC load. The system uses the 8051 microcontroller family. A keypad is used to input information to the microcontroller, with ZVS as a reference. An LCD display is used to display information.

AC Power Controller with Programmable Interference

The block diagram of AC power controller with programmable interference can be built with Microcontroller (AT89S52/AT89C51), Power Supply Block, Keypad, LM358 (Comparator), LCD Display, MOC3021, 1N4007, BC547, LED, Resistors, Capacitors, SCR. Keil µVision IDE and MC Programming Language: Embedded C

AC Power Controller with Programmable Interference Block Diagram

Power Supply

The power supply circuit can be built with a step-down transformer, which steps down …

Unlocking the ATtiny85: A Beginner’s Guide to Programming and Hacking

Powerful yet Pocket-Sized: Getting Your Brand New ATtiny85 to Run Arduino Code from Scratch

This guide will walk you through the process of preparing your brand new ATtiny85 microcontroller to run your Arduino code, unlocking the convenience of a small yet powerful device.

ATtiny85 Pinout

The diagram below shows the details of the ATtiny85’s pinout. Notice the Arduino labels given to the 5 GPIO, plus all the other ways the pins are named.

Below is a much simpler image, showing just what is needed for running your Arduino code.

Breadboard Setup

Start by placing the ATtiny85 in the middle of a breadboard. Connect the Vcc and GND pins to the Power and Ground rails on your breadboard.

Notice that on my breadboard, I have connected the Power and Ground rails on either side, to make it easier to organize things.

It is strongly recommended to put a 0.1uF capacitor on the Vcc pin of the ATtiny85, with the other side going to ground. This will help get rid of any noise on the power line.

Finally, place a 10k Ohm resistor between the Rest pin and Power (Vcc). This will prevent the ATtiny85 from accidentally resetting.

Turn Arduino Uno into ISP

This guide will use an Arduino Uno as our ISP (In-System-Programmer).…

Unlocking the 555 Timer: Creative Circuits and Projects for Engineers

The 555 timer is a versatile and widely used device in embedded system design, commonly employed in various electrical and electronics projects to generate precise clock pulses. Despite its popularity, many people remain unaware of its internal circuitry. In this article, we’ll delve into the inner workings of the 555 timer circuit, empowering you to build innovative projects and experiment with its capabilities.

Let me know if you’d like me to make any further changes!

555 Timer Circuits

The 555 timer integrated circuits are used to generate an  accurate square wave commonly used in many electronics circuits. The 555 timer circuit has designed with 20 transistors, 16 resistors, 2 diodes and a flip-flap. It can be operated in the range of 4.5v to 15v DC supply. The 555 timer IC has basically three functional parts such as;

Comparator

It is used to compare two input voltage levels which is inverting (-) one and non-inverting (+) terminals. If the voltage is high at the non-inverting terminal, then the output is high. The input resistance of ideal comparator is infinite.Voltage divider

As the input resistance is infinite in the comparator, so the…